Light Tent DIY - 1st Test
Jan 17, 2016 19:07:38 #

I posted a topic entitled "Light Tent DIY" back on Jan 5, 2016 and it started quite a discussion.
One of the replies I received was from DJO and he noticed a possible flaw in my design. The flaw had to do with reflections.
Well....I finally got around to running my light tent through some tests. DJO was correct as I suspected.
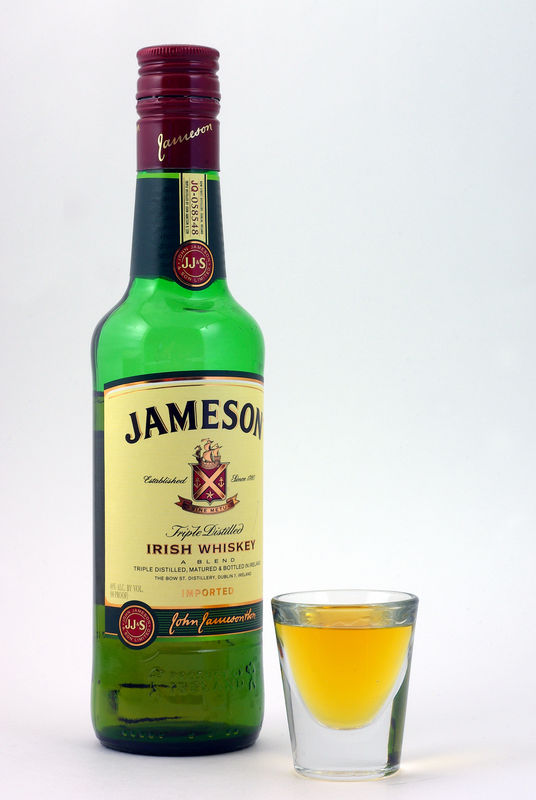
I tried shooting glass products today and tried many different lighting positions. I have posted what I feel was my best shot and as seen the reflections are many and very distracting.
I have fair results with items that have low reflective properties as seen in my post entitled "Light Tent Photos".
However I will have to do some redesigning to rid the photos of the reflections when shooting highly reflective items. Any ideas you have and would like to share are welcome.
I have had fun with this DIY project so far have learned a few thing from it.
update:
Sorry for posting the same pic,,,forgot to make it downloadable.
One of the replies I received was from DJO and he noticed a possible flaw in my design. The flaw had to do with reflections.
Well....I finally got around to running my light tent through some tests. DJO was correct as I suspected.
I tried shooting glass products today and tried many different lighting positions. I have posted what I feel was my best shot and as seen the reflections are many and very distracting.
I have fair results with items that have low reflective properties as seen in my post entitled "Light Tent Photos".
However I will have to do some redesigning to rid the photos of the reflections when shooting highly reflective items. Any ideas you have and would like to share are welcome.
I have had fun with this DIY project so far have learned a few thing from it.
update:
Sorry for posting the same pic,,,forgot to make it downloadable.

Jan 17, 2016 19:32:56 #

Highplains Coyote wrote:
I posted a topic entitled "Light Tent DIY&quo... (show quote)
You might find this interesting
https://www.youtube.com/watch?v=SsPYqxXNMJ0
Phils got a lot of very good video's on youtube aimed towards the amateur without a massive budget.
Jan 17, 2016 20:05:09 #
Thank You, blackest.
I watched the video and I shall give it a try.
I watched the video and I shall give it a try.
blackest wrote:
You might find this interesting
https://www.youtube.com/watch?v=SsPYqxXNMJ0
Phils got a lot of very good video's on youtube aimed towards the amateur without a massive budget.
https://www.youtube.com/watch?v=SsPYqxXNMJ0
Phils got a lot of very good video's on youtube aimed towards the amateur without a massive budget.
Jan 17, 2016 20:46:30 #
DO not know if it would work, but what would happen if you used a Polarizing filter?
Jan 18, 2016 03:21:06 #
jdubu
Loc: San Jose, CA
For lighting bottles and glass items, you want to control the light. You cannot do that with a light tent.
Lighting needs to be diffuse and tall, not wide, to give a soft highlight and contour to a bottle. Distance and placement will widely affect the resulting light. Inches matter. An evenly lit bottle has no dimension and will look flat. fill lighting or reflectors will enhance the shadow side. Sometimes a reflector or tall focused light behind the bottle will help make the liquid pop.
You have a bit of that contouring soft light on the neck of your bottle, try to continue it down the body w/o hot spots. If you still want to use a tent, you will need to subtract or block light with gobos to get better definition.
Jan 18, 2016 07:08:05 #
Highplains Coyote wrote:
I posted a topic entitled "Light Tent DIY" back on Jan 5, 2016 and it started quite a discussion.
Good result. Is the whiskey really that color?
Jan 18, 2016 08:19:06 #
Try searches online, or on Youtube for
Photographic lighting jewelry for eBay
Photographic lighting glassware for eBay
I teach eBay classes and have seen some interesting information on these searches. These searches will turn up some very specific hits, as well as hits on lighting equipment.
Photographic lighting jewelry for eBay
Photographic lighting glassware for eBay
I teach eBay classes and have seen some interesting information on these searches. These searches will turn up some very specific hits, as well as hits on lighting equipment.
Jan 18, 2016 08:28:28 #
MCHUGH
Loc: Jacksonville, Texas
rgrenaderphoto wrote:
DO not know if it would work, but what would happen if you used a Polarizing filter?
The Polarizing filter will remove reflections only if the light source is also Polarized when dealing with glass or metal reflections.
Jan 18, 2016 10:53:06 #
Looks good! (both photos and subject LOL). I used light tents extensively back in my commercial photography days (1980s) to photograph jewelry and other shiny objects. Always liked the results.
Rick
Rick
Jan 18, 2016 13:48:08 #
MCHUGH wrote:
The Polarizing filter will remove reflections only if the light source is also Polarized when dealing with glass or metal reflections.
I started to make a similar comment but since this is not metal, I let it go. This is a comment you are very unlikely to find elsewhere and could be key for you (and me).
Anyway, you can find film for the light source online. Mine has been ordered.
Fil Hunter et al (the gods of light) discuss filtering the light source. They sound a slight negative note about effort needed, but it can't be that bad.
Jan 19, 2016 07:07:01 #
Hats off to you for even trying this! (Not the light tent, but rather your subjects....)
I tried doing bottle shots 2 years ago, but this is one photo discipline I admit defeated me. I can see all the wrong things in your image, but have very little advice of how to overcome, but I will share some info if you don't mind, and maybe you can get it right from there.
Firstly can I say - I looked at your light tent construction, and I know your conduit frame will ALWAYS reflect in the bottle or any other reflective material. Any break, line or shadow WILL show up, and the liquid inside your bottle will deflect the reflection to unheard of places. Meaning you think its on the left, but it could be up down or from the side.
Next - if you are shooting wine, whiskey or whatever bottles:-
- the label MUST face the camera head on and all aspects and details of the label must be as sharp and clear as possible.
- the cap and neck label must be equally head on, visible, clear and sharp and without imperfections. A lot of money is spent on designing the bits that go onto the bottle and is owned by the producer. The bottle is secondary really in this case.
If you then use the contents of your product in a separate container as you have done here, a whole lot of "rules" come into play. (Jerry mentioned the color, which I agree in this case is way off - it looks a bit like an egg - sorry!)
- different liquids/ alcohols have different glasses.
- whiskies and cognacs (and others) WILL require best quality crystal
- some drinks must have ice. Trust me, not "from your freezer" either. There are people that specialize in producing individually hand crafted ice cubes where you can pay anywhere from $45 per cube! The number of cubes will vary per drink, as per the rules...
- the level in the glass changes per drink. Just as an example - white wine and red wines are different. White wine glasses should appear chilled, red not.
These are but a few of the obstacles I came across in my efforts. In no ways am I trying to put you off, but as I said, this was one area where I threw in the towel.
But, if you have not come across them yet, here is a website I found that has excellent, and I really mean excellent examples and tutorials on product photography.
https://www.photigy.com/
Good luck and I do hope you come right!
Jan 19, 2016 08:11:46 #
Thank you for this great critique. It is very helpful.
This is my first attempt at this kind of shot. I don't think I really want to drink that "egg yolk". I tried to correct it but everything I did made it look worse.
The label advise is very helpful. I wondered about that.
$45/cube,,,whew! That is something I doubt I will be buying.
Never-the-less I will try a few more times just for giggles and grins.
DwsPV wrote:
Hats off to you for even trying this! (Not the lig... (show quote)
Jan 25, 2016 13:37:06 #

The goal of a good food or beverage advertising photography is basically making the viewer hungry and/or thirsty by glamorizing the product. In this case, ostensibly, you want them to go off their local alcoholic beverage store and seek out the product. In the commercial end of my business, we tell our clients that we make a portrait of their products, not a mug-shot! It's like the difference between a fine low or high key portrait and a passport photograph.
As others here have suggested, you don't want a documentary image of the bottle and the label, rather, you need an artistic interpretation of the essence of the product. With glass bottles, you want controlled reflections to emphasize the contours of the bottle and not scattered hot spots or specular highlight all over the product. This is why totally tenting the product is not the best way to go with this kind of shot. Tenting with reflected or diffused light is more appropriate for certain highly reflective products such as chrome finished small appliances such as a classic semi-dome shaped kettle which acts like a convex mirror and reflects everything in the room including the photographer, all the lights, and the camera.
The suggested U-Tube videos by Phillip McCordal and Tony Generico are an excellent example of the techniques I am using.
Now- the good news is that you are not all that far off the mark. You are using reflected (indirect) light or diffused direct light in your tent construction so you are half way there in recognizing the value of controlled and/or diffused light. The problem is, when you construct a fixed box-like product set, you loose the exact aesthetic control that you need. The methods illustrated in those videos are basically as if you took your box apart and used the trans-illuminated of reflective panels and placed them exactly where you need them to be to make the visual statement that you want to achieve. A fixed lighting pattern is less likely to help you achieve an artistic result.
I don't want to get into techno-babble and mathematics but especially, in this kind of photography, the ANGLE OF INCIDENCE theory is essential to understand. It's simple enough: The angle of incidence is equal to the angle of reflection. Eg: If a light strikes the subject at 45 degrees it reflects the light back at 45 degrees. If you place the camera at the angle of reflection you will get the maximum degree of reflection and may end up with a hot spot, a washed out highlight or a reflection where you do not want it. If however, the camera is placed perhaps at 0 degrees, straight on to the subject, a more diffuse or manageable highlight is possible. It's like when wedding photographers shoot a picture of the bride primping in the mirror, of the camera and the light source are at an oblique angle to the mirror, you won't see the light source (flash-back) or the photographer and the camera in the mirror image.
In the case of this kinda of product photography, all you need is one simple light source and some simple reflector panels or cards to redirect the light exactly where you want it. As per the angle of incidence theory, you do not want any light coming directly from the camera position as it going to reflect right back into the lens. If you notice in the videos, all the reflectors are placed from about 35 to about 135 degrees to the camera/subject axis or if the supply frontal fill, they are well above or under the camera angle, therefore, the angle of reflection is well our of the frame. Sometimes there is a light source behind the subject acting as a background light.
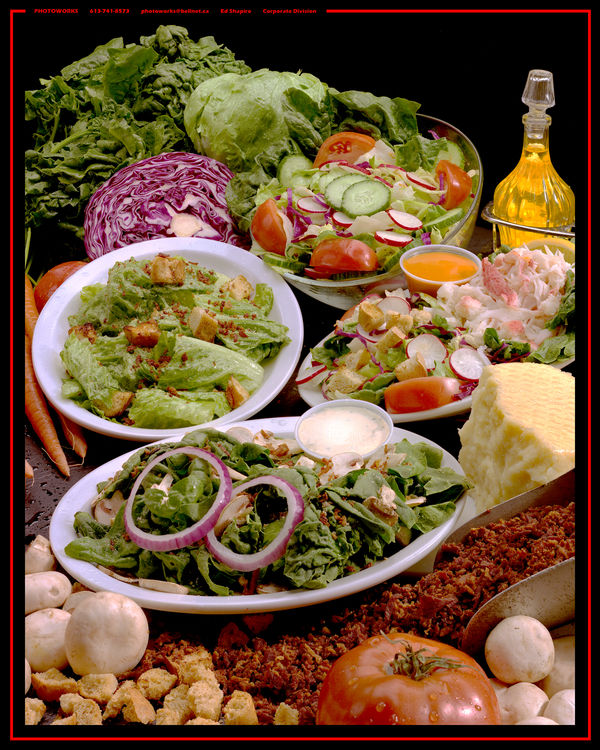
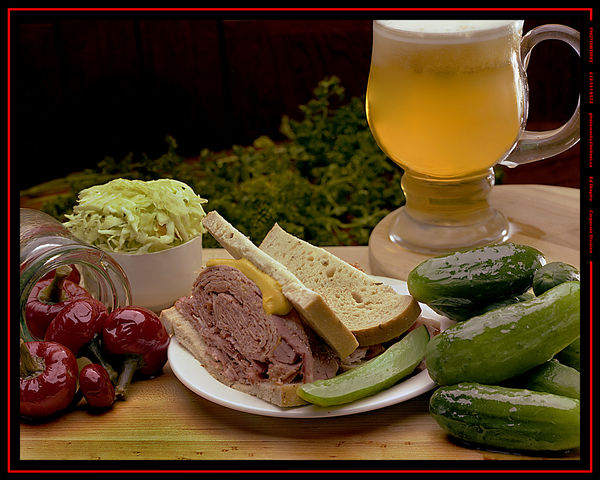
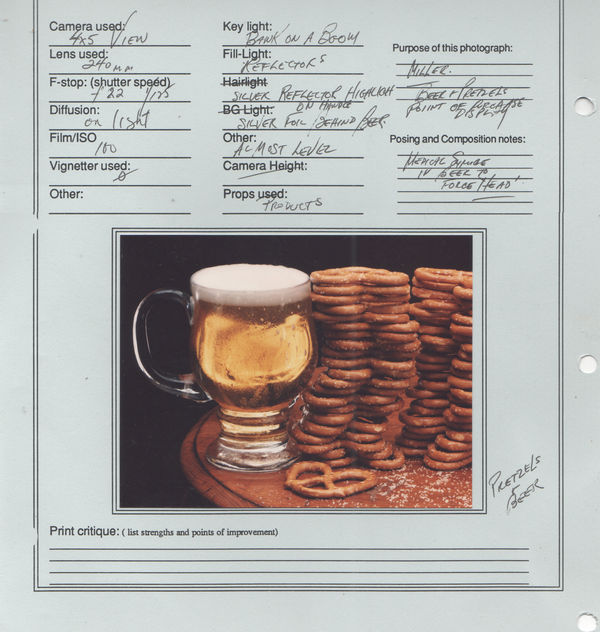
At my studio, we do shoot our share of beer, booze, wine and soft drinks. We do, however, shoot a great deal of FOOD, which includes beverages or bottle of dressings, oils and syrups. A simple small piece of aluminum foil cut to shape and hidden behind a glass product on a food set, will beautiful trans-illuminate the glass or bottle without any other additional light sources. The attached images were made with one overhead (big) softbox and a few strategically placed reflectors. The softbox was suspended over the set by means of a boom stand and brought back slightly and tilted a bit toward the camera position- a good angle of incidence to create good texture and shed enough light forward for the reflectors to pick up and redirect.
A few more tips for you: When shooting bottled beverages or even canned ones, make sure the label is centered, in full view and carefully lighted buy your off-camera reflectors. Select a bottle with no scratches or defects in the label and clean off any marks or fingerprints.
Think of a theme: What I call good booze is usually aged well, produced by an old and time-honored brewery, so even if it isn't, I don't want it to look like a bottle of sneaky-peat or worse a bottle of solvent or paint thinner! So... I go in for a low key antique kinda look or a very clean high key image, depending on the product.
Color- If the color of the beverage is shown in a clear glass container or especially in a glass, color rendition is of the utmost importance. Wine connoisseurs are hypersensitive and fussy about the color of the product so it must be as accurate as possible. Good light will help in this effort but is also important to work carefully in post production whew colors can be precisely adjusted. One mistake I have noticed allot is when the entire image is enhanced in saturation and vibrancy, the color of the liquid is overly exaggerated whereby a glass of whiskey that is supposed to be a bit brownish or light amber begins to look like a glass of dark yellow stuff well I am trying to be polite here, so let's say a urine sample and that would be a no-no!
Oh! you can use any number of light sources- in one of the videos, a reading lamp is used and yielded great results, Fill reflectors and gobos (black light blockers) can be made of Foam-Core, Cor-Plast, aluminum foil, or foil-covered Styrofoam insulation material- all cheap! Cloths-hanger wire and a glue gun are handy and inexpensive materials.
In the attached images there is a salad bar with a bottle of oil and the other one is from an add I did for beer and pretzels . You may notice my data sheet- I keep a record of many of my commercial and portrait jobs for reference and teaching purposes. When learning different techniques it good to keep such a log as well!
I hope this helps, good luck in your projects!
Ed
As others here have suggested, you don't want a documentary image of the bottle and the label, rather, you need an artistic interpretation of the essence of the product. With glass bottles, you want controlled reflections to emphasize the contours of the bottle and not scattered hot spots or specular highlight all over the product. This is why totally tenting the product is not the best way to go with this kind of shot. Tenting with reflected or diffused light is more appropriate for certain highly reflective products such as chrome finished small appliances such as a classic semi-dome shaped kettle which acts like a convex mirror and reflects everything in the room including the photographer, all the lights, and the camera.
The suggested U-Tube videos by Phillip McCordal and Tony Generico are an excellent example of the techniques I am using.
Now- the good news is that you are not all that far off the mark. You are using reflected (indirect) light or diffused direct light in your tent construction so you are half way there in recognizing the value of controlled and/or diffused light. The problem is, when you construct a fixed box-like product set, you loose the exact aesthetic control that you need. The methods illustrated in those videos are basically as if you took your box apart and used the trans-illuminated of reflective panels and placed them exactly where you need them to be to make the visual statement that you want to achieve. A fixed lighting pattern is less likely to help you achieve an artistic result.
I don't want to get into techno-babble and mathematics but especially, in this kind of photography, the ANGLE OF INCIDENCE theory is essential to understand. It's simple enough: The angle of incidence is equal to the angle of reflection. Eg: If a light strikes the subject at 45 degrees it reflects the light back at 45 degrees. If you place the camera at the angle of reflection you will get the maximum degree of reflection and may end up with a hot spot, a washed out highlight or a reflection where you do not want it. If however, the camera is placed perhaps at 0 degrees, straight on to the subject, a more diffuse or manageable highlight is possible. It's like when wedding photographers shoot a picture of the bride primping in the mirror, of the camera and the light source are at an oblique angle to the mirror, you won't see the light source (flash-back) or the photographer and the camera in the mirror image.
In the case of this kinda of product photography, all you need is one simple light source and some simple reflector panels or cards to redirect the light exactly where you want it. As per the angle of incidence theory, you do not want any light coming directly from the camera position as it going to reflect right back into the lens. If you notice in the videos, all the reflectors are placed from about 35 to about 135 degrees to the camera/subject axis or if the supply frontal fill, they are well above or under the camera angle, therefore, the angle of reflection is well our of the frame. Sometimes there is a light source behind the subject acting as a background light.
At my studio, we do shoot our share of beer, booze, wine and soft drinks. We do, however, shoot a great deal of FOOD, which includes beverages or bottle of dressings, oils and syrups. A simple small piece of aluminum foil cut to shape and hidden behind a glass product on a food set, will beautiful trans-illuminate the glass or bottle without any other additional light sources. The attached images were made with one overhead (big) softbox and a few strategically placed reflectors. The softbox was suspended over the set by means of a boom stand and brought back slightly and tilted a bit toward the camera position- a good angle of incidence to create good texture and shed enough light forward for the reflectors to pick up and redirect.
A few more tips for you: When shooting bottled beverages or even canned ones, make sure the label is centered, in full view and carefully lighted buy your off-camera reflectors. Select a bottle with no scratches or defects in the label and clean off any marks or fingerprints.
Think of a theme: What I call good booze is usually aged well, produced by an old and time-honored brewery, so even if it isn't, I don't want it to look like a bottle of sneaky-peat or worse a bottle of solvent or paint thinner! So... I go in for a low key antique kinda look or a very clean high key image, depending on the product.
Color- If the color of the beverage is shown in a clear glass container or especially in a glass, color rendition is of the utmost importance. Wine connoisseurs are hypersensitive and fussy about the color of the product so it must be as accurate as possible. Good light will help in this effort but is also important to work carefully in post production whew colors can be precisely adjusted. One mistake I have noticed allot is when the entire image is enhanced in saturation and vibrancy, the color of the liquid is overly exaggerated whereby a glass of whiskey that is supposed to be a bit brownish or light amber begins to look like a glass of dark yellow stuff well I am trying to be polite here, so let's say a urine sample and that would be a no-no!
Oh! you can use any number of light sources- in one of the videos, a reading lamp is used and yielded great results, Fill reflectors and gobos (black light blockers) can be made of Foam-Core, Cor-Plast, aluminum foil, or foil-covered Styrofoam insulation material- all cheap! Cloths-hanger wire and a glue gun are handy and inexpensive materials.
In the attached images there is a salad bar with a bottle of oil and the other one is from an add I did for beer and pretzels . You may notice my data sheet- I keep a record of many of my commercial and portrait jobs for reference and teaching purposes. When learning different techniques it good to keep such a log as well!
I hope this helps, good luck in your projects!
Ed
If you want to reply, then register here. Registration is free and your account is created instantly, so you can post right away.