HDR Sunset - Problem with highlights around tree branches
Jan 6, 2015 01:09:35 #

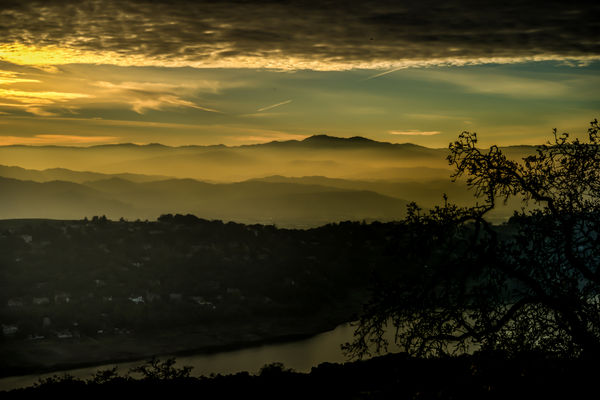
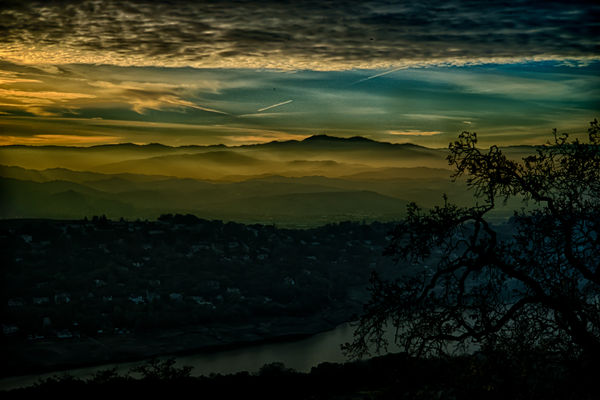
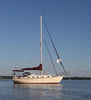
I have posted two HDR images using the same input images. Three shots doing -2, 0, +2 EV.
When you look around the branches of the tree on the right, it is much brighter right around the branches. Both the Photomatix and the NIK HDR Efex pro 2 are doing the same thing. I tried using the two darkest shots for a two-image HDR, and it is still doing the same thing. Even tried setting control points with NIK Viveza 2 and trying to darken just the bright area. But other things tend to darken too.
I start from Lightroom and use it to call either of these two SW packages.
I do find the NIK SW seems to favor making the image a bit sharper. And there is a different look between these two products. The Photmatix SW tends to make the thin low hanging clouds more a soft flowing expanse, and the NIK SW seems to cut through those clouds a bit. I probably need to reduce the blue cast in the NIK also.
But my concern is the brightness surrounding the branches on the tree. Every shot I made is experiencing this problem.
Photomatix HDR
(Download)
NIK HDR Efex Pro 2
(Download)
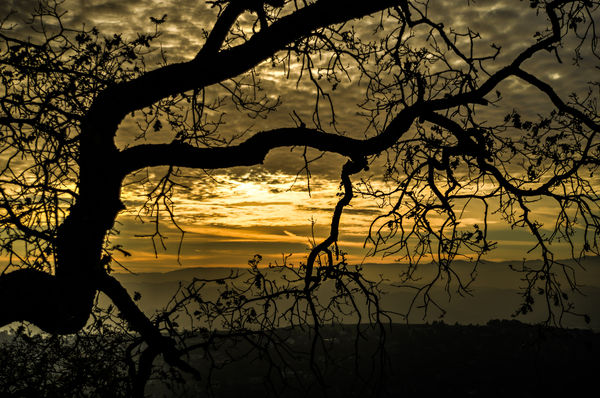
A 3rd shot with brighter backgound
(Download)
Jan 6, 2015 01:16:00 #
All I see is light reflecting off the water showing through the branches. Did you want the tree to be totally dark for some reason?
Or are you referring to the upper part of the tree with the lighter/brighter sky behind it?
Or are you referring to the upper part of the tree with the lighter/brighter sky behind it?
Jan 6, 2015 01:28:48 #
Jan 6, 2015 02:59:45 #

Is this what you meant?
After using the unsharp mask filter, if you find your image has unsightly halos, choose Edit > Fade Unsharp Mask. Set the mode to Luminosity and lower the Opacity until the halo is gone (50% works for me). This will remove the halos while preserving the sharpness.
altheman wrote:
Google remove halos in Ps
After using the unsharp mask filter, if you find your image has unsightly halos, choose Edit > Fade Unsharp Mask. Set the mode to Luminosity and lower the Opacity until the halo is gone (50% works for me). This will remove the halos while preserving the sharpness.
Jan 6, 2015 05:10:06 #
georgevedwards wrote:
Is this what you meant?
After using the unsharp mask filter, if you find your image has unsightly halos, choose Edit > Fade Unsharp Mask. Set the mode to Luminosity and lower the Opacity until the halo is gone (50% works for me). This will remove the halos while preserving the sharpness.
After using the unsharp mask filter, if you find your image has unsightly halos, choose Edit > Fade Unsharp Mask. Set the mode to Luminosity and lower the Opacity until the halo is gone (50% works for me). This will remove the halos while preserving the sharpness.
The way I have done it in the past is copy the the layer and set the blend mode to darken and use the clone stamp fill in the halos
Jan 6, 2015 05:41:21 #
So basically you use the stamp cursor like a brush to "hand paint" away the the halos? I have used similar methods but they are very time consuming...I was hoping the method I copied from the Google search would do a whole area selected or even the whole photo at once. I have to find some time to try it out.
altheman wrote:
The way I have done it in the past is copy the the layer and set the blend mode to darken and use the clone stamp fill in the halos
Jan 6, 2015 05:44:13 #

Halos are the bane of HDR and sometimes not easy to remove or avoid.
The simple way is to adjust one of your original images to match your HDR images and with a layer mask in Photoshop bring the original sky through.
Second better way is to merge the three or more original images in Photoshop. Go File>Automate>Merge to HDR pro and follow the prompts. Change drop down box to 32 bit and save this as a TIFF. Open it in Camera Raw and get it so it matches your tone mapped image and as before stack them and brush the sky through with a layer mask.
If you feel they do not match apply a curves adjustment to base and to sky lighten them both combine the images and add a Soft Light blend mode.
As you can see this is all with Photoshop. Lightroom is great for adding pretty flags etc to photos has a great data base feature but does not contain the tools for HDR work. The tone mapped image is about 60% finished you have another 40% still to do and you need layers blend modes channels etc.
Your images here are well cooked and a lighter approach may have eliminated the halos but maybe not
The Smooth Highlights slider and Micro Smoothing slider can help with halos in Photomatix as can adjusting the lighting.
Many HDR people NEVER use a tone mapped sky but always use a sky from the original photos in some way or other. Photomatix is a very smart piece of software but it has not yet conquered skies. Also has a habit of turning a nice blue sky a wedgewwod dead sort of colour.
Hope this helps.
Jan 6, 2015 10:33:55 #

Jim on looking at yr NIK HDR Efex Pro 2 in the download it's very heavy on what I can only describe as noise in the sky.
Anything you have done to them I suggest you go back to the beginning after you do each stage check the results & see where it's picking up the problem.
OR
Try using sliders when & where you can watching for the problem showing itself.
Just a query, were these 3 cropped at all?
Baz
Anything you have done to them I suggest you go back to the beginning after you do each stage check the results & see where it's picking up the problem.
OR
Try using sliders when & where you can watching for the problem showing itself.
Just a query, were these 3 cropped at all?
Baz
Jan 6, 2015 10:36:47 #
I don't know if it can be done or how to do it but can you take the exposures down from 2 to 1?
Maybe in Photoshop? Others with PS experience might be able to answer that.
Baz
Maybe in Photoshop? Others with PS experience might be able to answer that.
Baz
Jan 6, 2015 10:47:07 #
Haveago wrote:
Jim on looking at yr NIK HDR Efex Pro 2 in the download it's very heavy on what I can only describe as noise in the sky.
Anything you have done to them I suggest you go back to the beginning after you do each stage check the results & see where it's picking up the problem.
OR
Try using sliders when & where you can watching for the problem showing itself.
Just a query, were these 3 cropped at all?
Baz
Anything you have done to them I suggest you go back to the beginning after you do each stage check the results & see where it's picking up the problem.
OR
Try using sliders when & where you can watching for the problem showing itself.
Just a query, were these 3 cropped at all?
Baz
There has been no cropping at all. I did try making vortual copies of the middle exposure and adjusting EV to -1 and +2 so that I had 5 images. But there was no change.
I have also tried every slider in both Photomatix and NIK HDR Efex and the halos never go away unless I leave the foreground so dark it is black.
I don't have Photoshop, so perhaps there is no solution.
Thanks
Jan 6, 2015 10:49:24 #
JimH123 wrote:
There has been no cropping at all. I did try making vortual copies of the middle exposure and adjusting EV to -1 and +2 so that I had 5 images. But there was no change.
I have also tried every slider in both Photomatix and NIK HDR Efex and the halos never go away unless I leave the foreground so dark it is black.
I don't have Photoshop, so perhaps there is no solution.
Thanks
I have also tried every slider in both Photomatix and NIK HDR Efex and the halos never go away unless I leave the foreground so dark it is black.
I don't have Photoshop, so perhaps there is no solution.
Thanks
Well they were all worth a try. :-) Maybe if you ask someone could have a go at the latter in PS.
Baz
Jan 6, 2015 18:31:28 #
JimH123 wrote:
There has been no cropping at all. I did try making vortual copies of the middle exposure and adjusting EV to -1 and +2 so that I had 5 images. But there was no change.
I have also tried every slider in both Photomatix and NIK HDR Efex and the halos never go away unless I leave the foreground so dark it is black.
I don't have Photoshop, so perhaps there is no solution.
Thanks
I have also tried every slider in both Photomatix and NIK HDR Efex and the halos never go away unless I leave the foreground so dark it is black.
I don't have Photoshop, so perhaps there is no solution.
Thanks
I think your probably right and it confirms my first post if you have already tried every slider. More exposures different EV will make no difference. Halos are produced as part of the tone mapping process.
One idea to try is instead of Tone Mapping try Fusion and probably Real Estate for these pictures. Fusion will reveal much less or no halos but will give you a much gentler looking HDR type image.
Without Photoshop avoid taking HDR photos where light or bright meets dark areas Rooftops and sky for instance. In fact avoid sky in your photos and PP with Lightroom limitations should be possible.
Good luck my man
Jan 7, 2015 05:59:41 #
JimH123 wrote:
I have posted two HDR images using the same input ... (show quote)
I don't see the "brightness" on the branches at all on a 28" screen; but I can see the river and sky showing through the dense branch clusters. Is that what you mean?
Jan 7, 2015 08:31:54 #
JCam wrote:
I don't see the "brightness" on the branches at all on a 28" screen; but I can see the river and sky showing through the dense branch clusters. Is that what you mean?
You have to download and look at it full screen and look around the branches of the tree on the right. There is considerable blooming (or you can call it halo) around all the branches where they overlay the darker background. This is a result of the HDR process where it has problems under these conditions.
Jan 7, 2015 09:04:08 #
JimH123 wrote:
You have to download and look at it full screen and look around the branches of the tree on the right. There is considerable blooming (or you can call it halo) around all the branches where they overlay the darker background. This is a result of the HDR process where it has problems under these conditions.
Ok, thanks, I was using the "download view"; I'll look again.
J
If you want to reply, then register here. Registration is free and your account is created instantly, so you can post right away.