Aperture Priority - A Beginners Guide
Mar 7, 2013 15:12:46 #
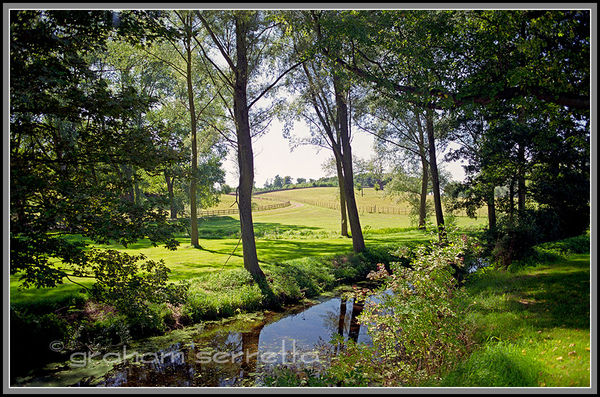
Here's my take on the various exposure methods that I use and the circumstances in which I use them. In this first piece I'll tell you the story of how this image was taken, using "A" or "Aperture Priority" mode:
The "aperture" is the "f" stop or "f" number. It is the opening in the iris diaphragm in the lens and controls the intensity of light (or the brightness of the image) passing through the lens to the sensor. The term "stop" comes from the days of plate cameras when the aperture was a metal disc with a hole drilled in its centre that was dropped into a slot in the lens and thus "stopped" the light according to the size of the hole. The "f" number is the ratio of the diameter of the aperture to the focal length of the lens. Each progressive f number allows double (or half) the amount of light to pass through the lens. Here is the table of progressive f numbers:
f/0.7 - f/1.0 - f/1.4 - f2.0 - f2.8 - f/3.5 - f/5.6 - f/8 - f/11 - f/16 - f/22 - f/32 - f/45 - f/64
The shutter speed is the duration of time that this light is allowed to strike the sensor, controlled in fractions of a second, each progressive setting giving half (or double) the duration of the previous setting.
Here is the shutter speed progression table in one EV steps:
1/15 - 1/30 - 1/60 - 1.125 - 1/250 - 1/500 - 1/1000 - 1/2000 - 1/4000
Now to the photograph-
There is a little stream flowing through a stand of trees through which fields and hedgerows are visible, that I wanted to photograph. Laden with tripod and camera bag, I managed to cross the stream without falling in. I had been there before and had returned on a number of occasions to view the scene at different times of the day and in different seasons, to decide on the best conditions in which to capture the scene. I didn't want the light too harsh, which would have been the case if the sun were overhead, so I chose mid morning when the sun is at an angle to the trees and penetrates into the clearing where the stream is visible. This also meant that the trees were back-lit with the reflection from the water providing some fill light.
I set up the camera on the tripod, fitted with a 35mm equivalent lens and connect a remote shutter release. Why a tripod? Because I wanted maximum sharpness combined with maximum depth of field and the least noise. Lets take those one at a time.
Maximum sharpness means no image blur caused by camera movement and precise focusing. The tripod and the remote release will eliminate camera movement. Maximum depth of field means that I want everything in focus from the foliage lining the bank of the stream immediately in front of me, right through to the distant hedgerows and trees on the horizon. I will therefore need to use a small aperture or f-stop (a big f-number) such as f/16 or f/22 and I will need to set the focus distance so that the far limit of the depth of field falls on the distant horizon and not beyond it. This will ensure that the near limit of the depth of focus falls as close to the camera as possible. The lens will therefore have to be focussed at the "hyperfocal" distance for the aperture that I am using. I choose to use f/16.
I don't use f/22 because I know from researching the test results of the lens I am using that diffraction effects will reduce the sharpness of the image at apertures smaller than f/16. I find the hyperfocal distance from a handy app on my iPhone, but I also carry a small chart that I can use. The lens is also marked with a scale as it is a prime lens. If you only have a zoom lens with no such markings, you should focus one third of the distance into the scene, and take at least three shots at slightly different focus settings. Least noise means that I will have to use a low ISO sensitivity setting, as the higher the ISO, the more noise there will be in the image, especially in the shadows. The lowest ISO that my camera can be set to is 100.
With ISO 100 set and the camera in "A" or Aperture Priority mode with the aperture set to f/16 and the exposure meter set for spot reading, I take three readings, one of the sky above the horizon, the brightest part of the scene, one from the sun-lit grass on the far bank of the stream (the area that I want to be a mid-tone) and one from the shadow under the tree branches on the right of the scene. Aperture priority mode locks the aperture at my chosen setting of f/16. The sky reads f1/2000th, the grass reads 1/125th and the shadows read 1/15th.
The mean aggregate reading was an exposure value of 1/125th at f/16 which is the centre of the dynamic range of the scene, which covers seven EV (Exposure Value) steps. (1/15th to 1/2000th). At an ISO of 100 and a aperture of f/16 a shutter speed of 1/125th would give me an exposure that would place the sky at the extreme right hand side of the histogram, or off of the toe of the density curve, resulting in some loss of highlight detail and the shadows at the left hand end, or at the peak of the density curve, provided that the camera's sensor was capable of recording the full 7 EV range, which most are. However, in order to drag the entire brightness range down at least one EV, in order to avoid clipping of the highlights, I decided to shift the exposure to 1/250th at f/16. This placed the highlights just inside the extreme right-hand limit of the histogram and brought the sunlit grass to a more comfortable, slightly darker mid-tone position while blocking up the shadows, but only in the Jpg. I knew that there would still be plenty of shadow detail available in the RAW image file that could be extracted in Lightroom.
I therefore set an exposure of 1/250th at f/16 at ISO 100 and wishing that a nice big Blue Heron would come along and land on the bank of the stream, I exposed three images, bracketed at -1EV, zero and +1EV, in RAW + Jpg.
Download:
I converted the RAW file to DNG and re-named it with a prefix denoting the camera type, during import into Lightroom, when both the RAW and the Jpg files are saved to primary and backup drives. I then applied the usual preliminary adjustments such as exposure, brightness, contrast and white balance, and applied the lens profile correction tool to correct any lateral chromatic aberration or fringing before opening the image in Photoshop CS5. I then adjusted the levels slightly, and used the Shadows & Highlights tool to lighten the shadows until I could just see detail in the foliage. I also applied a small amount of highlight recovery, just to be sure that nothing was blown out in the sky. A little colour saturation, a small amount of unsharp mask, and I saved the file as a Tiff in my Master Files drive, adding Master to the file name, again backed up on an external drive and also transferred to my cloud archive in Dropbox. I then created a sharpened file suitable for printing an 11 x 14 print at 300 dpi complete with watermark and imbedded AdobeRGB colour space profile, and saved this as a Tiff file with the word 11x14pr added to the filename, in my Prints folder. I then reverted to the master file and created a 1024 x 756 pixel Jpg file at 96 ppi, watermarked, compression 6, sRGB colour space, sharpened, for web use which I saved in my Web folder as well as in the cloud, with the word Web appended to the file name. This is the file you see here.
The master file was also used to create a 24 x 36 inch print file, without watermark, for exhibition use.
FAQs:
Could I have hand-held the camera?
Probably. Even at a shutter speed as slow as 1/60th, you should have no problem taking a sharp shot provided your camera holding and your shutter release techniques are good and well practised. I always remind myself that, in the days when cameras only had two shutter speeds, 1/60th and "B", millions of people got sharp shots by learning to hold the camera steady and release the shutter without jerking. If you have one of the new lenses or cameras fitted with image stabilization you should have even less problems. I often take three bracketed shots indoors, handheld, to make an HDR image, where tripods are not allowed, using a VR lens and I get sharp results. It just takes a very steady hand! If, however, you intend printing the image larger than 8 x 12 inches, I strongly recommend that you use a tripod.
Could I have used the camera's exposure meter set to matrix metering?
Probably. A matrix meter would, in my opinion, have underexposed the scene, but you could have taken a number of shots with varying degrees of exposure compensation dialled in and viewed the histograms, until you got the exposure that you wanted. I shot this in RAW because I knew that I could extract greater detail out of the shadows if necessary, without blocking out the highlights. The dynamic range is just on the limit of a Jpg file's capability unless you are adept at adjusting the in-camera picture control settings (contrast, sharpening and saturation).
Could I have used a polarising filter?
Absolutely yes! I didn't use one simply because I forgot to bring one along, but if I had used a CPL, I could have deepened the blue of the sky nicely and improved the surface of the water at the same time by eliminating some of the reflection. Note that a polarising filter would absorb 2 EV of light and I would therefore have had to expose the above image at a shutter speed of 1/30th, making a tripod mandatory.
What about the white balance?
I left the WB set on "Auto" for this shot, but to some, it is a little cold as it came from the camera. However, if I tweak the RAW file's WB to be ever so slightly warmer by setting it to "shade", I lose the saturation of the greens in the grass, which also affects the grass in the sunlight (my mid-tone).
Could I use my kit zoom lens?
Yes, set at a focal length equivalent to 35mm on a full-frame camera. That means around 24mm on an APS sensor sized camera. The label "Kit lens" has resulted in the image quality of these lenses being regarded as inferior. This is not always true as the camera manufacturers would not supply their latest high-tech camera with a lens that would not impress the purchaser with the quality of the images. There are a number of so called kit lenses that have superb image quality, two of my favourites being the ubiquitous Nikon AFS Nikkor 18-55mm f3.5-5.6 VR II DX and the Canon AF-S 15-85mm f3.5-5.6 IS USM.
How do I set the focus distance if I don't have any markings on the lens - can I use the preview button?
The Depth of Field preview button will close the lens aperture to the aperture set for taking the image. This results in a darkening of the image on the focusing screen in the viewfinder making it very hard, if not impossible to judge the sharpness of the different parts of the scene. If you have live view, you should use that instead, and use the magnify button to check sharpness. You can also use the rear LCD screen to preview a test image, and use the zoom function to zoom into the image and check for sharp focus at various places in the scene.
Next time I'll give an example of using "S" or "Shutter Priority" mode.
Remember, it's all in the light!
Graham Serretta
London 2013
Hertfordshire Landscape
Mar 7, 2013 15:22:59 #

What a wonderful walk-through! May I add this link to A Guide to the Basics of Photography http://www.uglyhedgehog.com/t-100473-1.html
Mar 7, 2013 15:43:24 #
St3v3M wrote:
What a wonderful walk-through! May I add this link to A Guide to the Basics of Photography http://www.uglyhedgehog.com/t-100473-1.html
Of course you can. Thanks for the kind words.
Mar 7, 2013 15:47:30 #
GrahamS wrote:
Of course you can. Thanks for the kind words.
St3v3M wrote:
What a wonderful walk-through! May I add this link to A Guide to the Basics of Photography http://www.uglyhedgehog.com/t-100473-1.html
Of course you can. Thanks for the kind words.
Yours were well stated where I felt a part of your conversation.
Mar 7, 2013 16:00:24 #
Very good, easy to understand walk thru and your photo is lovely. As a beginner I seem to either end up to far from my subject or to close to the subject. Anyone have ideas on choosing how far or close to get to the subject?
zuzanne
zuzanne
Mar 7, 2013 16:01:12 #
St3v3M wrote:
Yours were well stated where I felt a part of your conversation.
GrahamS wrote:
Of course you can. Thanks for the kind words.
St3v3M wrote:
What a wonderful walk-through! May I add this link to A Guide to the Basics of Photography http://www.uglyhedgehog.com/t-100473-1.html
Of course you can. Thanks for the kind words.
Yours were well stated where I felt a part of your conversation.
Engagement is the whole idea...
Mar 7, 2013 16:04:11 #
zuzanne wrote:
Very good, easy to understand walk thru and your photo is lovely. As a beginner I seem to either end up to far from my subject or to close to the subject. Anyone have ideas on choosing how far or close to get to the subject?
zuzanne
zuzanne
Some say to keep back a bit in case you need to frame it later so you will not lose anything where you can always crop later, while others, especially street photographers, say when you think you are close get even closer. In the end, I think only you can decide what you want out of the moment.
In short, think about the story you are trying to tell. Does the background add to or take away from it?
Mar 7, 2013 16:06:36 #
zuzanne wrote:
Very good, easy to understand walk thru and your photo is lovely. As a beginner I seem to either end up to far from my subject or to close to the subject. Anyone have ideas on choosing how far or close to get to the subject?
zuzanne
zuzanne
There are many different opinions on that. Capa said that if your photo was no good, you weren't close enough. My approach is to get as close as I can and then back off until the composition looks good. It's very subjective. To "train" your eye, fit a fixed focal length prime lens to your camera, such as a 50mm, and zoom with your feet for a while. Leave any other lens at home.
Mar 7, 2013 16:17:45 #
Relli
Loc: Michigan
Thank you for the well explained of your detailed process you shared with us. I am attempting to push myself into using my MANUAL on my Power Shot camera. And if I like my results as well as enjoy the experience, I will later buy a DSLR.
I probably would have bought a new camera with kit already but heard so many bad things about the lens that I was going to buy the body first and lens later. Maybe you convinced me otherwise with your spectacular image.
This was a very clear explanation. And since you did that so well, maybe you could write one on using aperture to get a shallow definition.
I hope that is not a lot to ask.
RELLI
Mar 7, 2013 16:50:29 #
zuzanne wrote:
Very good, easy to understand walk thru and your photo is lovely. As a beginner I seem to either end up to far from my subject or to close to the subject. Anyone have ideas on choosing how far or close to get to the subject?
zuzanne
zuzanne
There is no way to answer such a general question, but usually better to err by being closer. I learned MANY years ago that if you are taking a "people" picture, make sure it is of the Person(s) and don't make a scenic image out of it.
Mar 7, 2013 16:50:57 #
Relli wrote:
This was a very clear explanation. And since you did that so well, maybe you could write one on using aperture to get a shallow definition.
I hope that is not a lot to ask.
RELLI
This was a very clear explanation. And since you did that so well, maybe you could write one on using aperture to get a shallow definition.
I hope that is not a lot to ask.
RELLI
Relli, I will post more beginner's guides in the near future - watch this space.
Mar 7, 2013 16:55:28 #
Mar 7, 2013 17:05:10 #
ballsafire
Loc: Lafayette, Louisiana
On using aperture to get a shallow definition (depth of field) the subject must be close to the lens, the F number should be small SO THAT THE APERTURE (hole) is wide, and the kind of lens used such as a wide angle lens as opposed to a telephoto lens with less depth of field. You will learn this when you get a DSLR like I just did. I am asking a few questions on this forum already and you should know enough to ask the right questions. I really like my point and shoot cameras such as my Sony Hx 100 which is not too far away in performance of DSLR's and a lot simpler.
Mar 7, 2013 17:08:37 #
Graham, clear and concise, a very scholarly explanation. I for one will be looking for your future posts. Even those of us who feel we know all the answers benifit from reading something so well presented. Thank you for the thought and effort you put into this.
Mar 7, 2013 17:33:07 #
ballsafire wrote:
and you should know enough to give the correct answers..... you should know enough to ask the right questions.
If you want to reply, then register here. Registration is free and your account is created instantly, so you can post right away.